How to Design a Modern Kitchen Without a Full Remodel
The smartest kitchen upgrades aren’t always the biggest ones. In many homes, the most effective changes come from improving how the space feels and...
3 min read

In 2009, I moved to Ann Arbor with my wife and daughter (with a son on the way). We fell in love with the charm of the Old West Side (the proximity to town, the parks, the walkability) and purchased our first house. It is not a large house at just around 1300 SF, but it suited us well and the original wood trim and glass-paned French doors from the foyer to the living room screamed out “I am the house you will buy!”
We were also pleased that the previous owner had done the work of finishing a good portion of the basement with a full bathroom and a larger bonus room/in-law guest room, leaving us one less project for the immediate future. The one limiting aspect to our home was that it contained a shared driveway, and with that a shared garage structure … which I later found out was the stable for the original property that had included the entire block. Our neighbor (who happens to be the best neighbor to share a driveway with), has a two-car garage while our side contained a one-car garage with a separated storage room entered from the side towards our backyard. As a designer at Meadowlark, I needed a project at home. Here it was!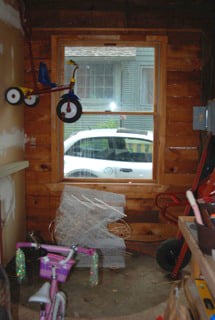 While I appreciated the storage space to keep my tools, I didn’t think it had to be so large and I didn’t want my children to hide behind the lawnmower when playing hide and seek.
So I wrote down what I wanted out of the space and went about figuring out how to get it with the least amount of work (a.k.a. $$$) as possible.
Tool storage
Kids’ play area
Adult entertaining area
Three-season extension of the backyard
Then I listed out the steps to make it happen (If you get nothing more from this blog, please remember this: writing things down helps the process, whether you are DIYing or hiring a designer/builder). Some of the design elements I wanted were out of the scope of my construction skills and out of my budget at the time and I hope they will be part of a future Meadowlark project.
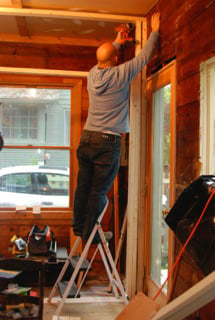
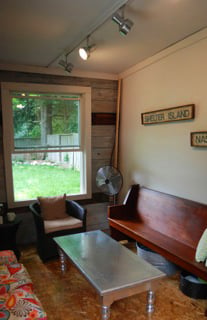
Tackling the first step was incredibly rewarding. It really challenged me to get creative with my storage design skills. I took advantage of the extra space in the garage (especially elevated up on the walls) to store some of the bigger items. I then put a series of shelves using L brackets and reclaimed wood that was left with the house when we purchased it. I was able to fully condense the tool storage area into a space just larger than a coat closet and it fits my wheel barrow, table saw, gardening tools, and many more things without the “I threw everything in the closet” mess. The only drawback was that it would have to be accessed from the main space adjacent to the exterior door. This was a great opportunity for a “pocket door” because it would eliminate the obstacle of the two doors swinging into each other…and who doesn’t love pocket doors? So even though the tool area was accessed through the main space, the entryway to it acted as a buffer. Step 1-3 done.
For step 4, we used a panelized subfloor system that has an OSB top surface with a plastic gridded bottom to allow for the wood to sit above the cold and sometimes wet concrete garage floor. We then applied multiple layers of polyurethane and were really pleased with both the look and feel of it. It allows the kids to be in there without shoes on and gives the space the warmth it needed. Step 4 done.
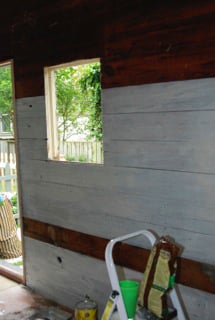
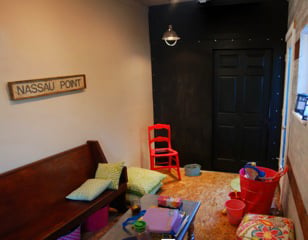
For step 5, we did some basic decorating strategies to bring the space alive: a fresh coat of paint, the use black and white strategically to allow other colors to stand out, and put a stripe on the wall…which for us meant not staining one of the horizontal wood boards. Finally, and most importantly, use chalkboard paint. The kids love using the space now and I feel that it is a space that will grow with them.
Most homes have similar spaces to reclaim…an attic, a basement, a mudroom, a garage, a shed… spaces that can become added living space. And they don’t have to be big…you’d be surprised what a good designer can do.
What spaces are you ready to reclaim? We’d love to hear from you.

The smartest kitchen upgrades aren’t always the biggest ones. In many homes, the most effective changes come from improving how the space feels and...
When the outside world feels stressful, there is nothing better than coming home to a space that feels welcoming, calm, and restorative. With a few...

1 min read
Every home remodeling journey comes with its own set of emotions, and no project is without its ups and downs. After remodeling homes in the greater...